The short answer
This beginner-friendly guide is for anyone who has a printed family photograph and wants to make a careful restoration on an iPhone without replacing the original file.
You can restore an old photo on an iPhone by first making a clean, high-resolution digital copy, then choosing a tool that matches the damage: restoration for scratches and fading, unblur for soft detail, or colorization for a black-and-white image.
The most important step is not the app. It is starting with the best copy you can make. A glare-filled phone photograph gives any restoration tool less real information to work with.
Keep two digital files: an untouched master and a working copy that you send to the restoration app.
Protect the original photograph
Do not write on, tape, flatten by force, or clean a fragile photograph with liquid. If a print is cracked, flaking, stuck to glass, or historically valuable, photograph it as it is and consider asking a photograph conservator for advice. The Library of Congress photograph-preservation FAQ explains why originals should be protected from damaging handling and storage conditions.
The Library of Congress recommends keeping a master scan and using a separate working copy for edits. Its personal archiving guidance describes 300–400 dpi as a practical range for ordinary snapshot enlargements, while very small prints, slides, and negatives can need more detail. See The Basics of Scanning from the Library of Congress.
Capture the cleanest possible image
If you have a flatbed scanner
Use it when possible. Place one photograph at a time on clean glass, align it without forcing the edges, and scan in color even if the print looks monochrome. A color scan retains stains, fading, paper tone, and other information you may want to inspect later.
For a normal snapshot print, 300–400 dpi is a practical starting point. Select a higher setting for a tiny print or when you plan to crop a small face. More resolution is not automatically better once the scanner has captured all the detail present in the paper.
Save the master as TIFF if the scanner supports it and storage is not a concern. Export a high-quality JPEG copy for the restoration app.
If you are using the iPhone camera
Turn off the flash if it creates glare. If the print is glossy, move the light sources rather than tilting the phone. A tilted capture changes facial proportions and makes borders harder to correct.
Crop the border—but keep one uncropped master
Duplicate the master, then crop the table or scanner bed from the working copy. Keep all four edges of the actual photograph if they contain handwriting, a studio mark, a date, or evidence of the original format.
Avoid aggressive perspective correction around faces. Correcting a severely angled capture can stretch one side of the image. If that happens, recapture the photograph with the phone more parallel to the print.
Identify the real problem
Old photographs often have several kinds of damage, but each tool should have one clear job.
- Restore for scratches, folds, spots, fading, and general age damage.
- Unblur when the image is soft or a face lacks clarity.
- Colorize when the source is black and white and you want a plausible color version.
- 4K or upscaling only after the main restoration looks right.
- Magic Eraser for a specific unwanted mark or object that remains after restoration.
Do not apply every tool automatically. Repeated processing can make skin too smooth, sharpen film grain into false texture, or gradually change small facial features.
Restore the working copy
In RenewShot:
- Open the app and choose Restore.
- Select the working copy from your photo library.
- Check that the image is upright and includes the area you want to repair.
- Start the restoration.
- Compare the result with the original before saving.
Restore is the best first pass when a photograph has mixed age damage. If the only issue is softness, start with Unblur. If the photograph is structurally clean but monochrome, go directly to Colorize.
Inspect reconstructed details
AI restoration can produce a convincing image, but convincing is not the same as historically exact. When source detail is missing, the system may construct a plausible version rather than recover information that still exists in the pixels.
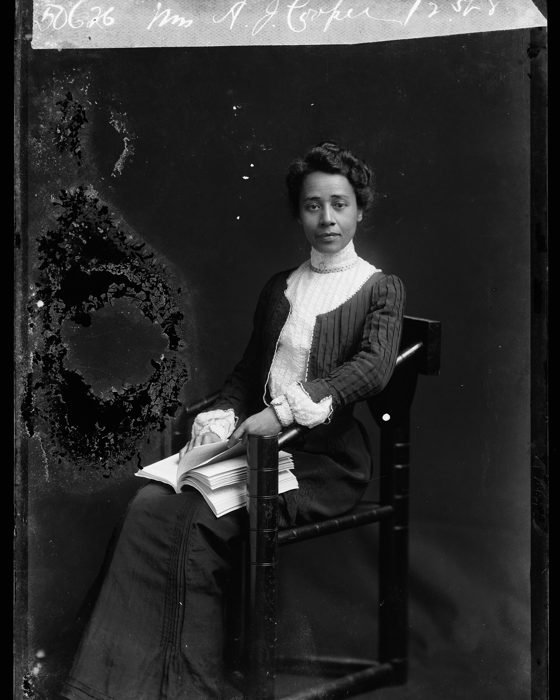
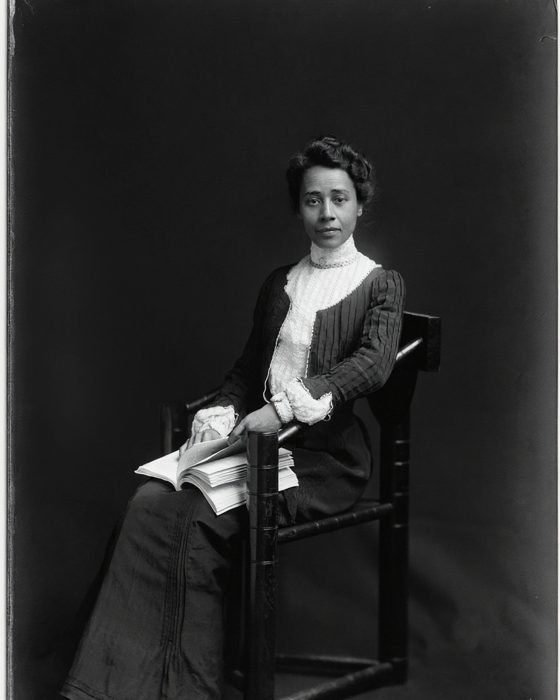
Compare these details at a useful zoom level:
- Eyes, teeth, ears, and hairlines.
- Glasses, jewelry, and small accessories.
- Military insignia, medals, and uniforms.
- Handwriting, dates, labels, and signs.
- Fingers and objects held in a hand.
- Repeating patterns in clothing or furniture.
If a face no longer looks like the person, keep the less aggressive result or restore a different scan. For family history, identity matters more than maximum sharpness.
Colorize carefully
Colorization can make a photograph feel more immediate, but it cannot know every original color from grayscale alone. Skin tone, clothing, walls, cars, and uniforms may be plausible rather than verified.
Use Colorize after you are satisfied with the restored structure. Keep two versions:
- The restored black-and-white image.
- The colorized interpretation.
If historical accuracy matters, compare uniforms, flags, products, or locations with dated reference material. Label the image as colorized when sharing it in an archive or genealogy project.
For the complete preparation, comparison, and labeling workflow, read how to colorize black and white photos on iPhone, or see the RenewShot Colorize feature.
Save, back up, and print
Save the highest-quality result available, then check its pixel dimensions before printing. Do not overwrite the master scan.
A simple file structure helps:
1948-grandparents-wedding-master.tif1948-grandparents-wedding-working.jpg1948-grandparents-wedding-restored.jpg1948-grandparents-wedding-colorized.jpg
Store the files in at least two places. Include a short text note with the names, approximate date, location, who supplied the photograph, and what restoration was performed.
If you plan to print, make a small proof first. Screens can hide over-sharpening, weak shadows, or unnatural skin color that becomes obvious on paper.
Common restoration mistakes
Photographing the print under one ceiling light
This creates a bright reflection and dark corners. Use two soft light sources from opposite sides.
Restoring a screenshot instead of the original file
A screenshot may reduce resolution and add interface borders. Use the original scan or camera file.
Running the result through several enhancers
More processing is not always more accurate. Compare every pass with the master and stop when the photograph looks natural.
Treating colorization as historical evidence
AI chooses plausible colors. Keep the monochrome restoration and disclose that the color version is an interpretation.
Throwing away the damaged original
The original contains physical and historical information that a digital restoration cannot replace. Store it in an appropriate sleeve or archival enclosure.
Which RenewShot tool should you use?
| Your photo problem | Start with | Use next only if needed |
|---|---|---|
| Scratches, spots, folds, fading | Restore | Unblur or 4K |
| Soft or blurry face | Unblur | Restore if damage remains |
| Clean black-and-white photo | Colorize | 4K for a larger output |
| Small object or isolated mark | Magic Eraser | Restore |
| Short animated memory | Restore first | Live Memory |
The result depends on the source image. A larger, evenly lit capture with visible facial detail gives the tool more real information than a compressed screenshot or a photograph taken through glare.
Limitations and how this guide was prepared
The before-and-after example on this page is a genuine RenewShot output, but one example is not a controlled benchmark and does not predict the result for every photograph. Damage type, capture quality, compression, face size, and missing source detail can all change the outcome.
We checked the displayed result against its original at full view and at a face-detail crop. We then reviewed the preservation and scanning recommendations against primary guidance from the Library of Congress and the Federal Agencies Digital Guidelines Initiative. We did not test physical conservation methods, negatives, slides, or every iPhone model for this article.
RenewShot can reconstruct plausible visual detail; it cannot prove historical accuracy. For valuable originals, severe physical damage, or archival projects, keep the unedited master and consult a qualified photograph conservator.
Start with the capture, not the effect
Make the cleanest digital copy you can, preserve an untouched master, and choose one tool for the most visible problem. After processing, compare the face, hands, writing, and small objects with the original before saving.
If the result still looks like the same person and the repaired areas look natural, save it as a new file. If not, return to the master and try a cleaner capture or a less aggressive tool.
If your next step is adding color, continue with the dedicated black-and-white photo colorization guide.
Old photo restoration questions
Can an iPhone restore a badly damaged old photo?
It can help repair visible scratches, fading, blur, and damaged-looking areas, but it cannot guarantee recovery of details that are absent from the source. Preserve the master copy and consider professional manual restoration for severe damage or historically important photographs.
Should I scan an old photo at 300 or 600 dpi?
For common snapshot prints, 300–400 dpi is often a practical baseline. Use a higher setting for a very small print, a face you intend to enlarge, or a professional preservation workflow. Cultural heritage projects use more rigorous, size-dependent targets; see the FADGI technical guidelines.
Will colorization recover the original colors?
Not necessarily. Colorization generates plausible colors from visual context. Treat the result as an interpretation unless you can verify clothing, objects, and locations from other evidence.
Should I restore the black-and-white image before colorizing it?
Usually, yes. Repair scratches and structural damage first, inspect that result, and then colorize a copy so you retain both a clean monochrome restoration and a color version.
Can I restore the only copy of a family photo safely?
Digitize the photograph first and work on a duplicate file. Avoid physically cleaning, flattening, or removing a fragile photograph from glass unless you know the material is stable.
Sources
- Library of Congress: Personal Digital Archiving—The Basics of Scanning
- Library of Congress: Photograph Preservation FAQ
- Library of Congress: Preservation Guidelines for Digitizing Library Materials
- Federal Agencies Digital Guidelines Initiative: Technical Guidelines for Digitizing Cultural Heritage Materials